Suche
Suchergebnisse
Suchegaming light ,
finden 20 items
- Sortieren
- Nach Zeit
- Nach Popularität

Produkte
Applikationen
Uhrzeit - 3:24
• From sensors to gateways, Nuvoton powers the complete industrial ecosystem.
• Scalable Solutions: Ranging from M2003/M251 sensors (Modbus RTU) to high-performance MA35D1 Hosts.
• Smart HMI & Lighting: Featuring M55M1-based HMIs and DALI lighting control.
• Beyond Connectivity: Tailored solutions for specific industrial needs beyond standard Modbus.
#Nuvoton #NuMicro #Microcontroller #MCU #en #Embedded World #EW2026 #MCU #MPU #industrial control #gateway #sensors #CortexM23 #CortexM4 #CortexA35 #CortexM55 #HMI #DALI #lighting control #connectivity #Modbus #M2003 #M251 #M467 #M2U51 #MA35D1 #M55M1 #product #application
-
For more information, please visit Nuvoton Technology Website: https://bit.ly/3hVdcmC
Buy now: https://direct.nuvoton.com/
Contact us: https://www.nuvoton.com/support/technical-support/form/
Follow us on LinkedIn: https://www.linkedin.com/company/nuvoton-technology-corporation/
Produkte
Applikationen
Uhrzeit - 2:17
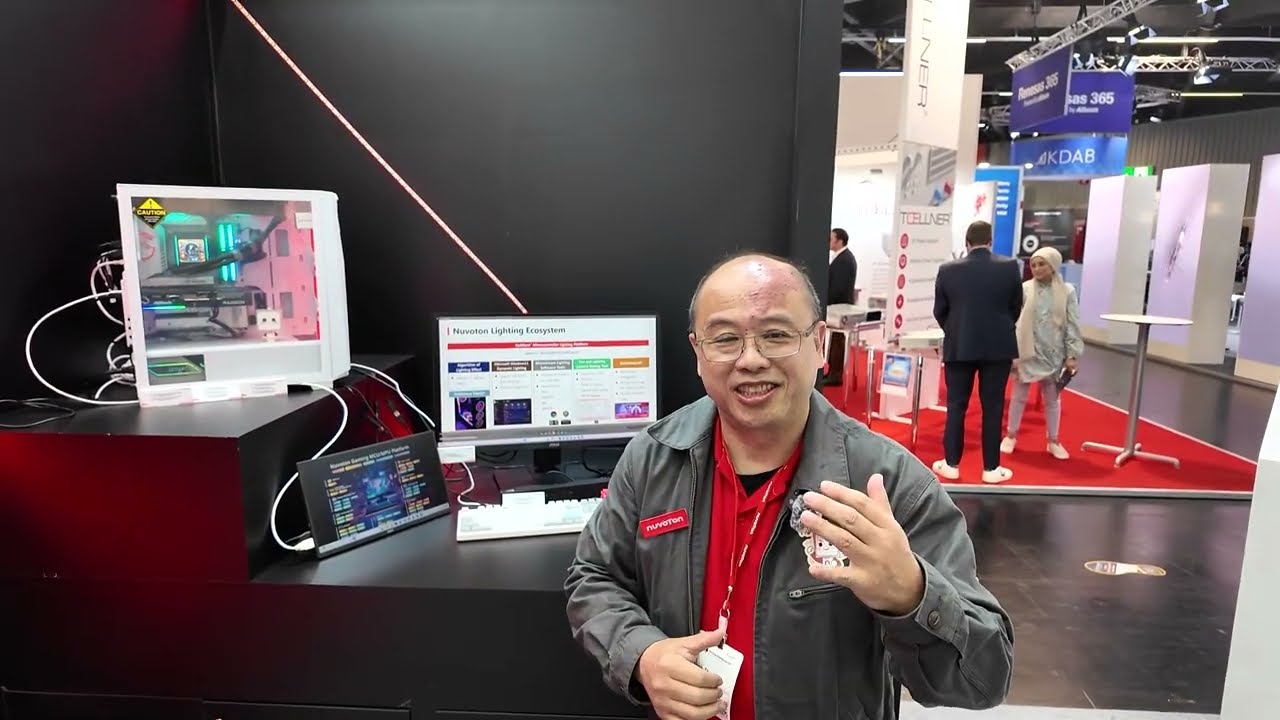
• Elevate the PC gaming experience with Nuvoton’s total solution for fan control, liquid cooling displays, audio amps, and ARGB/RGB lighting.
• Exclusive LLSI Hardware: Enables vibrant, customized lighting effects.
Windows 11 Dynamic Lighting: Fully supported for seamless software integration.
#Nuvoton #NuMicro #Microcontroller #MCU #en #Embedded World #EW2026 #MCU #Audio #gaming #gaming light #lighting control #LLSI #product #application
-
For more information, please visit Nuvoton Technology Website: https://bit.ly/3hVdcmC
Buy now: https://direct.nuvoton.com/
Contact us: https://www.nuvoton.com/support/technical-support/form/
Follow us on LinkedIn: https://www.linkedin.com/company/nuvoton-technology-corporation/

Produkte
Applikationen
Webinar
Uhrzeit - 30:37
● In many real-world applications, electronics must operate in sealed enclosures, outdoor cabinets, and high-temperature environments where standard industrial MCUs may face thermal derating or reduced reliability.
● This webinar will explore how Nuvoton's Automotive Grade Microcontrollers— featuring 125°C operating capability, CAN-FD, and robustness — helps engineers build more reliable systems for telecom backup power, energy storage, transportation infrastructure, and next-generation lighting applications.
#Nuvoton #NuMicro #Microcontroller #MCU #en #M2A23 #automotive-grade #125°C #High-Reliability #industrial #MCU #Battery backup unit #BBU
#Energy storage #Transportation infrastructure #ARGB lighting #General #Product #Application #Webinar
-
For more information, please visit Nuvoton Technology Website: https://bit.ly/3hVdcmC
Buy now: https://direct.nuvoton.com/
Contact us: https://www.nuvoton.com/support/technical-support/form/
Follow us on LinkedIn: https://www.linkedin.com/company/nuvoton-technology-corporation/

Applikationen
Seminar
Uhrzeit - 1:15
Powered by the M55M1 MCU, equipped with an Arm® Cortex®-M55 core and Ethos™-U55 NPU, the AI Smart Lamp integrates machine learning for wellness-focused automation. It detects user posture, provides real-time alerts via Nuvoton’s audio module, and features automatic power-saving functions. Combining intelligent sensing with energy efficiency, it redefines modern lighting solutions.
#Embedded World #EW2025 #endpoint AI #M55M1 #Cortex-M55 #Ethos-U55 #machine learning #NuEzAI #MCU #Intermediate #Application #Seminar #Nuvoton #NuMicro #Microcontroller #MCU #en
-
For more information, please visit Nuvoton Technology Website: https://bit.ly/3hVdcmC
buy now: https://direct.nuvoton.com/
contact us: SalesSupport@nuvoton.com

Applikationen
Seminar
Uhrzeit - 3:23
Nuvoton's TOF (Time-of-Flight) sensor enables precise in-cabin monitoring by capturing distance and object shape based on the reflected signal levels of pulsed NIR light. The system outputs 2D-IR and 3D-depth images simultaneously while eliminating background illumination noise, ensuring accurate object detection and spatial awareness.
#Embedded World #EW2025 #TOF #automotive #sensor #Intermediate #Application #Seminar #Nuvoton #NuMicro #Microcontroller #MCU #en
-
For more information, please visit Nuvoton Technology Website: https://bit.ly/3hVdcmC
buy now: https://direct.nuvoton.com/
contact us: SalesSupport@nuvoton.com

Ausbildung
Lernen
Uhrzeit - 12:26
This video demonstrates two sample codes of PWM by Nuvoton M031/M032 evaluation board. The first sample code is about breathing light. The second sample code is about fixed PWM duty. The video includes the sample code description, source code tracing, and the steps to compile and download. You can also see how the sample codes work as well. Users could easily know how to use PWM sample codes and Nuvoton evaluation board by following the steps.
#Level1Workshop #PWM #BreathingLight #Dynamic-PWM-duty #Fixed-PWM-duty #NuMicro #Nuvoton #MCU #SampleCode #Basic #General #Training #Learning #en
-
For more information, please visit Nuvoton Technology Website: https://bit.ly/3hVdcmC
buy now: https://direct.nuvoton.com/
contact us: SalesSupport@nuvoton.com

Produkte
Lernen
Uhrzeit - 2:47
The NuMicro® MA35D1 series is a heterogeneous multi-core microprocessor targeted to high-end edge IIoT gateway. It is based on dual 64-bit Arm® Cortex®-A35 cores with speed up to 1 GHz, and one 180 MHz Arm® Cortex®-M4 core. Based on the high-performance cores, the MA35D1 series facilities the tiny AI/ML for edge computing.
The MA35D1 supports 16-bit DDR2 and DDR3/ DDR3L SDRAM. For an easy system design and manufacture, the MA35D1 series also offers LQFP and BGA packages stacked with the DDR2/DDR3L SDRAM and density up to 512 MB, which significantly reduces PCB layer, size and electromagnetic interference (EMI).
The MA35D1 series is a trusted system for IoT products' security requirements. It includes several advanced security mechanisms such as Nuvoton Trusted Secure Island (TSI) an isolated secure hardware unit, TrustZone, secure boot, tamper-detection, built-in cryptographic accelerators, and a TRNG, as well as Key Store and OTP memory. All the security operations are performed in the TSI to protect sensitive and high-value data. The features also satisfy customers in IEC 62443 certification requirements.
For high-end edge IIoT gateway requirements, the MA35D1 series provides multiple advanced and high-speed connection interfaces, such as Gigabit Ethernet, SDIO3.0, USB 2.0 HS, and CAN FD, for edge gateway and new energy applications.
For HMI applications, the MA35D1 series provides a LCD display controller with the resolution up to 1920x1080 at 60 FPS, a 2D graphic engine, a JPEG and a H.264 decoder integrated for better graphical HMI effects and video playback.
NuMicro MA35D1 series targets the applications of:
- Edge Gateway
- Lightweight AI/ML
- HMI & Industrial Control
- New Energy Devices
Contact us to get more information. Start to evaluate NuMicro MA35D1 and innovate your products today.
#General #Product #Learning #en #MA35D1 #Nuvoton #NuvotonMPU #NuvotonHMI #NuvotonEdgeGateway #NuMaker-HMI-MA35D1-S1 #NuMaker-IoT-MA35D1-A1
-
For more information, please visit Nuvoton Technology Website: https://bit.ly/3hVdcmC
buy now: https://direct.nuvoton.com/
contact us: SalesSupport@nuvoton.com

Produkte
Tool
Lernen
Uhrzeit - 8:24
The video introduces Nuvoton's MPU N9H30's development set-up for Linux and Non-OS, taking NuMaker-emWin-RDK-N9H30 for example. Starting from the EVB introduction to BSP and related software downloads.
-
User manuals and related resource can be downloaded
https://www.nuvoton.com/products/gui-solution/gui-reference-design/numaker-emwin-rdk-n9h30/
First, we introduce how to program Linux OS to the N9H30 evaluation board
Find the N9H30 evaluation board resource that we used on Nuvoton’s Github and download the VMware Image
https://github.com/OpenNuvoton/MPU-Family
VMware application can be downloaded from the VMware website
https://www.vmware.com/tw/products/workstation-player/workstation-player-evaluation.html
First, open the VMware
Find the ubuntu_NUC970_980_Linux folder we downloaded
Choose Ubuntu 64-bit_nuvoton.vmx
Choose Play virtual machine
The password is “user”
It will take a while to open this application for the first time
Open the terminal when the system is ready
Enter NUC970_Buildroot-master folder
After entering the folder, we need to update the Buildroot tool
Enter the command as shown below
“git reset –hard”
“git pull”
After updating, enter the dl folder
Remove the original Linux kernel and u-boot
Enter the command as shown below
“sudo rm -rf linux-master.tar.gz uboot-master.tar.gz”
After entering, enter the password “user”
Leave the dl folder and enter the Buildroot folder
Enter the “make clean” command
You don’t need to do these steps unless updating Buildroot tools
Now, we set up the evaluation board configuration
Enter configs folder to search evaluation board name
Back to buildroot after searching
Enter “make nuvoton_n9h30_emwin_defconfig” to generate configuration file
After finishing these step, enter “make” to compile
It will take about three hours to compile
After compiling, copy the two files below to windows
“/NUC970_Buildroot-master/output/images/uImage”
“/NUC970_Buildroot-master/output/build/uboot-master/u-boot.bin”
Create text file ”env-nor.txt”
The content is shown below:
baudrate=115200
bootdelay=1
stderr=serial
stdin=serial
stdout=serial
setspi=sf probe 0 50000000
loadkernel=sf read 0x7fc0 0x200000 0x600000
bootcmd=run setspi;run loadkernel;bootm 0x7fc0
bootargs=noinitrd root=/dev/mtdblock2 rw rootfstype=jffs2 console=ttyS0 rdinit=/sbin/init mem=32M mtdparts=m25p80:0x200000@0x0(u-boot),0x600000@0x200000(kernel),-(user) ignore_loglevel
Then, we need to install NuWriter and related file
The NuWriter is a programming tool provided by Nuvoton. The NuWriter application and firmware code are open-sourced, and users can add new features or develop new user interfaces per user’s application
NuWriter: https://github.com/OpenNuvoton/MPU-Family
Open “NUC970_NuWriter-master”
Enter Driver folder and install “WinUSB4NuVCOM.exe”
Enter /Nuwriter/Release and execute NuWriter
Choose IC number based on the evaluation board
We need to program Image to SPI Flash, so we choose SPI
Here we need to turn the all Power-On Setting to ON
Push Reset button
Return to NuWriter to check the green light and the connection
If it is not connecting, click Re-Connect to reconnect
After confirm the connection, start to program Image
Program the three files to particular address
u-boot.bin program to 0xe00000
env.nor.txt program to 0x80000
uImage program to 0x200000
After programming, turn the Power-On Setting to off
Push the Reset button
Evaluation board can start to boot from SPI-NOR
After booting, we need to find the rcS demo application under/etc/init.d
Enter “chmod 777 rcS” to modify the application
Now, you can see the application on the evaluation board panel
Here, we finish compiling and programming
The next topic is how to compile and program Non-OS code
First, download MDK-Arm from the link below
https://www.keil.com/download/product/
Download the Non-OS BSP provided by Nuvoton
https://github.com/OpenNuvoton/MPU-Family
The BSP includes Keil environment set up user manual
Use Keil need to purchase the related license
After downloading, Open Keil uVision
Click the File on the upper left and choose Open
Go to the BSP that we downloaded choose BSP, SampleCode, emWin_SimpleDemo, KEIL and emWin_SimpleDemo.uvproj
Click Option for Target
Click Device and choose NuMicro ARM9 Database and N9H_series
After setting up, click Rebuild, and it will generate a sample code application which is a binary file
Open the NuWriter and connect it to the evaluation board
Choose SPI and search the application we built
\N9H30_emWin_Non-OS_BSP_v1.04.000\N9H30_emWin_Non-OS_BSP_v1.04.000\BSP\SampleCode\emWin_SimpleDemo\KEIL\obj\emWin_SimpleDemo_FW070TFT_24BPP.bin
Follow the setting and program the file to 0x0
After programming, turn the Power-On Setting to boot from SPI
You can see the demo application on the evaluation
#Basic #Product #Tool #Learning #en
-
For more information, please visit Nuvoton Technology Website: https://bit.ly/3hVdcmC
buy now: https://direct.nuvoton.com/
contact us: SalesSupport@nuvoton.com

Ausbildung
Tool
Lernen
Uhrzeit - 2:21
Hello everyone! I am Chris, the Field Application Engineer from Nuvoton Technology.
Today, I will introduce how to run a simple sample code on NuMicro M251/M252 series microcontroller.
First, we connect the M251/M252 NuMaker development Board to the computer.
Then click the M251/M252 BSP folder, click the Sample Code folder, template folder, Keil folder, and finally open the Template project file.
What we are going to do is running a simple GPIO Toggle LED Sample Code.
Introduce the main program briefly.
First, set GPIO PB14 to Output Mode.
After writing a small loop, set PB14 to reverse.
Finally, set CLK_SysTickDelay to 300,000 microseconds (uSec).
Before Rebuild, we must add the GPIO Source Code to the Library, find the corresponding Source Code and load it, and press Rebuild after it is complete. After the Rebuild, press Load and program the Code into the IC.
When programing is over, press the reset button on the development board to confirm whether the LED lights are flashing on the board.
That’s all for the tutorial of running sample code. Thank you for watching it. If you want to know more information, please feel free to contact us.
#Tool #Training #Learning #Intermediate #en
-
For more information, please visit Nuvoton Technology Website: https://bit.ly/3hVdcmC
Buy now: https://direct.nuvoton.com/numaker-m251sd
Contact us: SalesSupport@nuvoton.com
Ausbildung
Tool
Lernen
Uhrzeit - 5:0
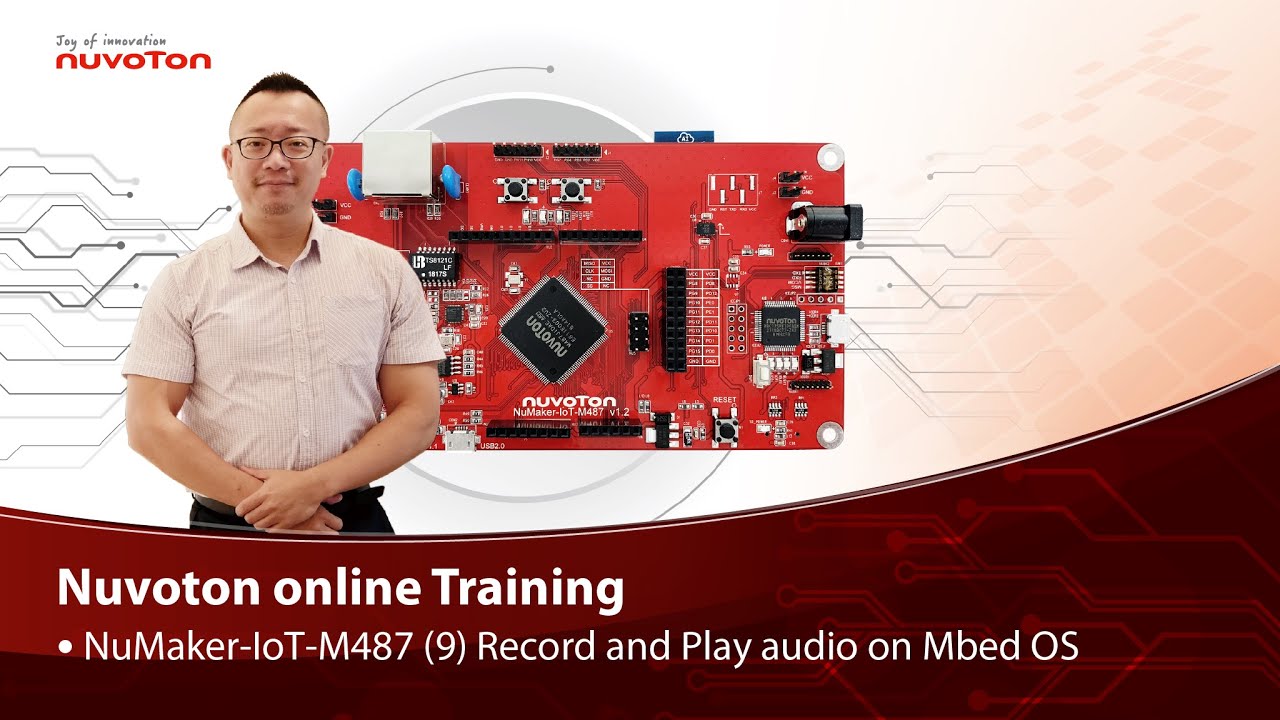
Hello everyone, I am Morgan, the principal engineer of Nuvoton Technology. Today, I will show you how to record and play audio with Mbed OS on NuMaker-IoT-M487 development board.
Open Chrome browser, and enter the URL https://ide.mbed.com to use the Mbed Online Compiler.
After log in, make sure that NuMaker-IoT-M487 board already selected in the upper right corner. If not, please refer Nuvoton IoT Tutorial series “Get Started with Mbed OS” which has a detailed description of how to add a board.
Click the “New” on the left of menu bar, a “Create new program” window will be displayed.
You can see that the Platform has been set to NuMaker-IoT-M487. In the Template, select the "NuMaker audio playback" for this tutorial. Then click OK.
Now you can see that the sample code has loaded on the page.
The sample code has three functions:
1. Record 10 seconds sound and save to Micro SD card
2. Play sounds stored in Micro SD card
3. Loopback. Record sound and play it immediately.
Click main.cpp to open it. Then scroll down to line 421. You can see the functions calls here. It set to loopback only.
Let’s do a little modification. Hit a key on console to start record 10 seconds then play it, and then do loopback.
printf("Press a key to start recording 10 seconds...");
getchar();
demo_record();
demo_play();
demo_loopback();
Save it and click “Compile” to build the code.
Compilation takes a while, please wait.
After the compilation is completed, “Success” will appear in the compile output window.
The browser downloads the binary firmware file directly after a successful compiling. It will be saved in a default download folder. In Chrome, you can click download file and select “Show in folder”.
Please plug an earphone commonly used for mobile phone in headphone jack on NuMaker-IoT-M487 board. For demonstration, we use a headphone splitter cable to connect a microphone and a speaker. Do not put the microphone and speaker too close to avoid feedback howling. Then connect the USB port to your computer and make sure the onboard LED lights up.
Back to the folder you just download the binary firmware file (NuMaker-mbed-AudioPlayback-example.NUMAKER_IOT_M487.bin). Drag and drop the file to NuMicro MCU drive.
You will see the copying progress dialog box.
Please find the virtual COM port assigned for NuMaker-IoT-M487 in Device Manager. In the demonstration, the “Nu-Link Virtual Com Port” is COMx.
Then use your favorite terminal tool. Here we use Putty. Open the COMx port with 9600 baud rate.
And no flow control settings. Then “Open” it.
Press “Reset” on board to run the firmware again.
Press a key on terminal to start record.
Speak for about 10 seconds, then your voice will be played.
That’s all for this tutorial. Thank you for watching.
Welcome to subscribe to our channel.
If you want to get more information, please contact us “SalesSupport@nuvoton.com”
-
For more information, please visit Nuvoton Technology Website: https://bit.ly/3hVdcmC
Buy now: https://direct.nuvoton.com/en/numaker-iot-m487
Contact us: SalesSupport@nuvoton.com
#tool #training #learning #intermediate #en

Ausbildung
Tool
Lernen
Uhrzeit - 3:55
Hello everyone, I am Morgan, the principal engineer of Nuvoton Technology. Today, I will show you how to use SD card with Mbed OS on NuMaker-IoT-M487 development board.
Open Chrome browser, and enter the URL https://ide.mbed.com to use the Mbed Online Compiler.
After log in, make sure that NuMaker-IoT-M487 board already selected in the upper right corner. If not, please refer Nuvoton IoT Tutorial series “Get Started with Mbed OS” which has a detailed description of how to add a board.
Click the “New” on the left of menu bar, a “Create new program” window will be displayed.
You can see that the Platform has been set to NuMaker-IoT-M487. In the Template, select the "NuMaker SD-File-System with SD mode" for this tutorial. Then click OK.
Now you can see that the sample code has loaded on the page. LittleFS uses less memory, supports power failure protection. However, LittleFS is different from the FAT file system, so after uses littleFS, the SD card will be formatted as LittleFS. The sample code uses FAT file system as default.
Just click “Compiler” to build the example.
It is in compiling, please wait a moment.
After the compilation is complete, “Success” will appear in the compile output window.
The browser downloads the binary firmware file directly after a successful compiling. It will be saved in a default download folder or the folder based on your browser setting. In Chrome, you can click download file and select “Show in folder”.
Please insert a micro SD card into the card slot on the back of NuMaker-IoT-M487 board, then connect the USB to your computer and make sure the onboard LED lights up.
Let’s back to the folder you just download the binary firmware file (NuMaker-mbed-SD-FileSystem-example.NUMAKER_IOT_M487.bin). Drag and drop the file to NuMicro MCU drive.
You will see the copying progress dialog box.
Please find the virtual COM port assigned for NuMaker-IoT-M487 in Device Manager. In the demonstration, the “Nu-Link Virtual Com Port” is COMx.
Then use your favorite terminal tool. Here we use Putty. Open the COMx port with 115200 baud rate
And no flow control settings. Then “Open” it.
Press “Reset” on board to run the firmware again.
You can see the messages on terminal while accessing SD card.
That’s all for this tutorial. Thank you for watching.
Welcome to subscribe to our channel.
If you want to get more information, please contact us “SalesSupport@nuvoton.com”
-
For more information, please visit Nuvoton Technology Website: https://bit.ly/3hVdcmC
Buy now: https://direct.nuvoton.com/en/numaker-iot-m487
Contact us: SalesSupport@nuvoton.com
#tool #training #learning #intermediate #en

Ausbildung
Tool
Lernen
Uhrzeit - 4:32
Hello everyone, I am Morgan, the principal engineer of Nuvoton Technology. Today, I will show you how to control the temperature and humidity sensor with Mbed OS on NuMaker-IoT-M487 development board. For this tutorial, we choose the “Thermo 6 Click” board. It is a mikroBUS board with a MAX31875 sensor. It is easy to install on NuMaker-IoT-M487 board because it has a mikroBUS connector. The part of control code refer from community, it is easy and quick to be integrated into real application.
Open Chrome browser, and enter the URL https://ide.mbed.com to use the Mbed Online Compiler.
After log in, make sure that NuMaker-IoT-M487 board already selected in the upper right corner. If not, please refer Nuvoton IoT Tutorial series “Get Started with Mbed OS” which has a detailed description of how to add a board.
Click the “New” on the left of menu bar, a “Create new program” window will be displayed. You can see that the Platform has been set to NuMaker-IoT-M487. In the Template, select the "NuMaker Thermo-Sensor MAX31875 " for this tutorial. Then click OK.
Now you can see that the sample code has loaded on the page. The sample code includes the MAX31875 control from community, declares an I2C object used on NuMaker-IoT-M487’s mikroBUS and a sensor object with the I2C object. Get the temperature value then print it. No modification needed, just click “Compile” to build the sample code.
It is in compiling, please wait a moment.
Then you can see the last message is “Success!” after compile completed.
The browser downloads the binary firmware file directly after a successful compiling. It will be saved in a default download folder or the folder based on your browser setting. In Chrome, you can click download file and select “Show in folder”.
Now is the time to install the Thermo 6 Click temperature and humidity sensor board on the mikroBUS, please pay attention to the correct orientation of the board.
Then we connect the NuMaker-IoT-M487 USB port to your computer and make sure the onboard LED lights up.
Let’s back to the folder you just download the binary firmware file (NuMaker-mbed-Sensor-MAX31875.NUMAKER_IOT_M487.bin). Drag and drop the file to NuMicro MCU drive.
You will see the copying progress dialog box.
Please find the virtual COM port assigned for NuMaker-IoT-M487 in Device Manager. In the tutorial, the “Nu-Link Virtual Com Port” is COMx.
Then use your favorite terminal tool. Here we use Putty. Open the COMx port with 115200 baud rate
And no flow control settings. Then “Open” it.
You can see the current temperature in Celsius and Fahrenheit printed on terminal.
That’s all for this tutorial. Thank you for watching. Welcome to subscribe to our channel. If you want to get more information, please contact us at SalesSupport@nuvoton.com
-
For more information, please visit: https://bit.ly/3hVdcmC
Buy now: https://direct.nuvoton.com/en/numaker-iot-m487
Contact us: SalesSupport@nuvoton.com
#tool #training #learning #intermediate #en
 粤公网安备 44030502010001号